
A Guide to Stunning Real Estate Photography
Originally published April 21, 2014, last updated April 25, 2014.
Eye-catching and attractive real estate photos get noticed. They capture a property's key features in their very best light. High-quality photography is one of the most critical components of real estate marketing so Landcast Real Estate has teamed up with Matt Edington and Clarity Northwest Photography to explore the details and techniques that lead to great real estate photos, particularly in Seattle and Western Washington.
Matt Edington is the founding member of Clarity Northwest, a Seattle based photography company that works with many of Seattle's most elite real estate brokers. Matt's work has been featured on the front page of The Huffington Post, in the Seattle PI, Seattle Magazine, The Puget Sound Business Journal, Seattle Homes and Lifestyles Magazine, Seattle Met magazine, and many more.
Matt Edington
President & Real Estate Photographer
Clarity Northwest Photography - Seattle
Phone...
Objectives in Seattle Real Estate Photography

What are you typically trying to accomplish in a real estate photo shoot?
My goals in each shoot are driven by my clients who are usually Seattle area real estate brokers. They want photos of the property looking its very best. They want photos that highlight key selling points and they want clear, dramatic photos that help their listings stand apart.
In Seattle, the weather, time of day and time of year dramatically change how a property looks. I usually try to depict a property as it would look on a sunny day in optimal light. Sometimes the timing works out and we can take photos on a gorgeous day, other times it doesn't and we'll enhance photos in post-production to show it with blue skies and bright colors.
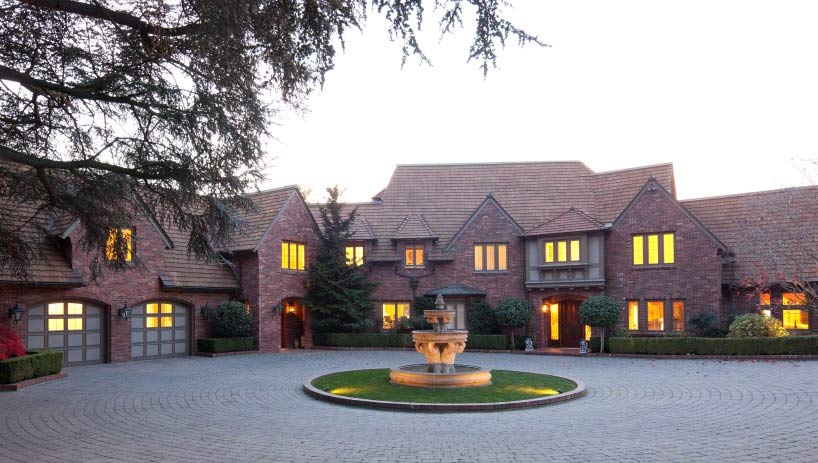
The objective with this photo was to show the scale of the home, the impeccable grounds and the gorgeous setting. To capture it, I needed to take the photo from far away to get it all into the frame. Sometimes, this requires going out in a boat, in this case, I was at the end of a dock. The other key was taking the photo just before sunset, when the light was perfect.
Equipment

What camera and lenses do you typically bring to a shoot?
It varies a little bit but there's some equipment I have with me every time:
- Canon EOS 5D Mark II Camera Body
- 17mm prime tilt-shift lens
- 24mm prime tilt-shift lens
- 24mm-105mm lens
- Canon 50mm prime lens (the nifty fifty)
- 70mm-200mm lens
- Tripod
- 2-4 strobes for lighting
- Wireless triggers
- Light modifiers
We also have a remote control drone with a built-in professional grade camera which we use on special occasions.
All told, I usually have over $13,000 worth of equipment with me. Each lens costs over $1,500 except for the 50mm 'nifty fifty' which you can buy for around $150.
See more aerial photography and condos in Seattle.
Lens Choice

What lens do you use most often for each type of shot?
For this exterior photo, I used a telephoto lens at around 75mm focal length. I got as far back from the property as I could and then zoomed in. This flattens the final image which helps keep the house looking large and more in-scale with the rest of the property.
For small spaces without room to move away from the subject, you typically use a wide angle lens which captures more of the subject in the frame. In this case, using a wide angle lens would distort the image in a way which would make the house seem smaller and the boat house and other things in the foreground disproportionally large.
Tilt-Shift Lens and Photography

What is tilt-shift photography and when do you use it?
Tilt-shift photography and a tilt-shift lens allow you to shift (or tilt) the scene in a photo up, down, right or left without the convergence of parallel lines. Keeping lines from converging is an important part of all real estate photography and this photo was for a designer's portfolio so it was particularly important. If this photo were taken straight on, without lens tilt and without angling the camera down, there would be too much ceiling in the photo. If you angled the camera down to capture less of the ceiling and more of the eating bar and chairs, the lines at the top of the photo would converge and look unnatural. Using the tilt-shift lens to tilt the photo down, we can capture the details of the kitchen, rather than the ceiling while keeping vertical lines, like those of the cabinets and windows, running straight up and down.
Exterior Photos

What are some keys to taking exterior photos?
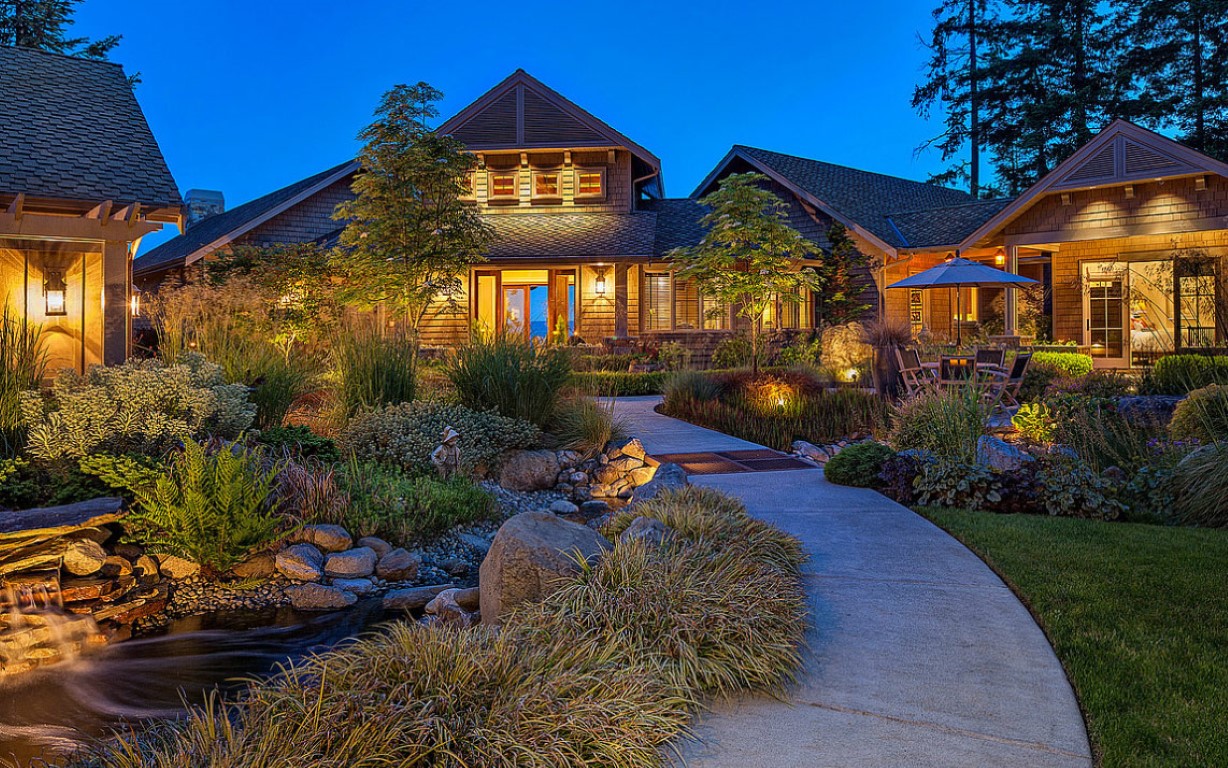
For this photo, I wanted to capture the unique and interesting design details of the home and this angle helped make it very clear. Being closer in, I used a wide-angle lens with tilt-shift which keeps all of the lines true (more on tilt-shift above). Since this was a dusk shot, we turned on every interior and exterior light and I strategically placed my extra lighting to illuminate parts of the exterior that needed it. I then took multiple photos from the exact some position with different exposures and blended them together for optimal exposure in post-production.
Time of Day
How does the time of day and light affect your shots?
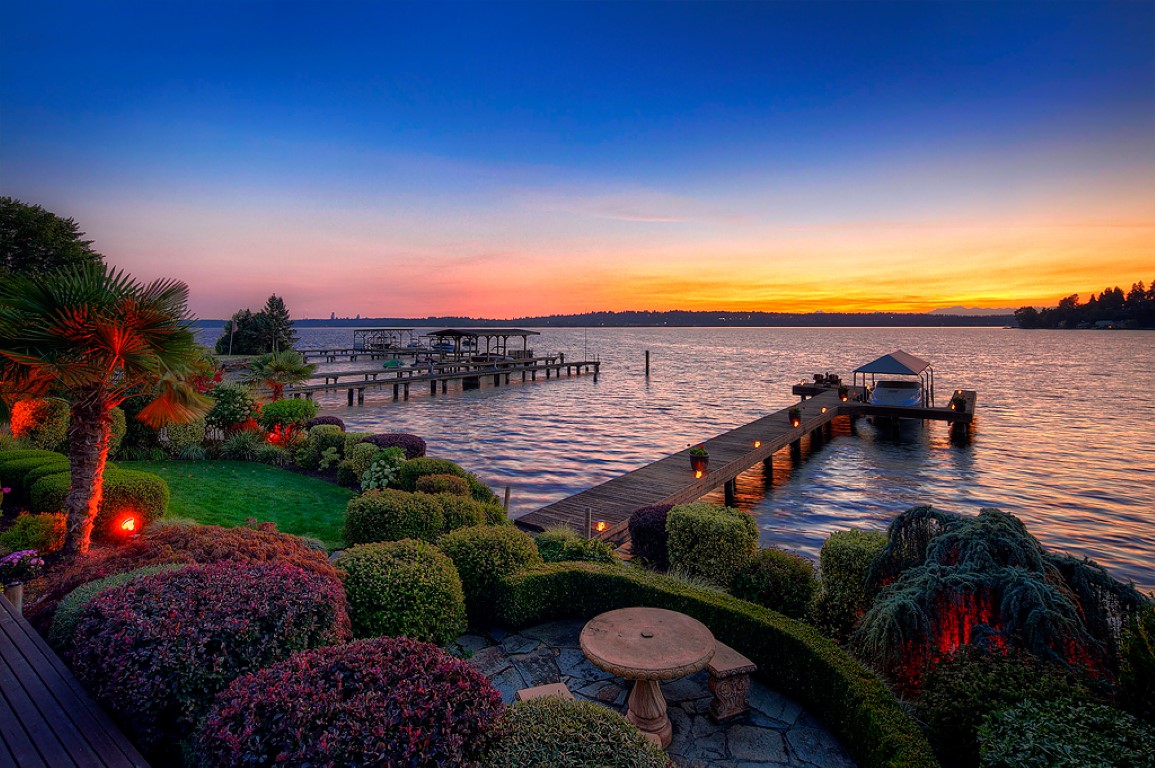
For certain shots, the lighting is everything. In this photo, we waited until after sunset when the sky lit up orange, pink and blue and there was still enough light for the water to have a warm shimmer. This photo was taken with my 17mm prime tilt-shift lens with multiple exposures later blended together (more on that later) in post-production. The landscape lights lit up the foreground which really helped make this photo feel right. In cases where there aren't landscape lights we'll often use our own lights to illuminate key parts of the property.
Taking Interior Photos

What are some basic keys to taking interior photos?
The most important part is having a couple high-end wide angle lenses. I use my 17mm and 24mm prime lenses for almost all interior shots. Just a reminder - this is a 17mm lens on a full-frame camera body. Most consumer DSLRs have crop-frame sensors which often come with 18mm wide-angle lenses. An 18mm wide angle lens on a crop-frame camera like the Nikon D3100 or Canon's 70D renders an image that is around 29mm focal length by standards of full frame camera's like the one I use.
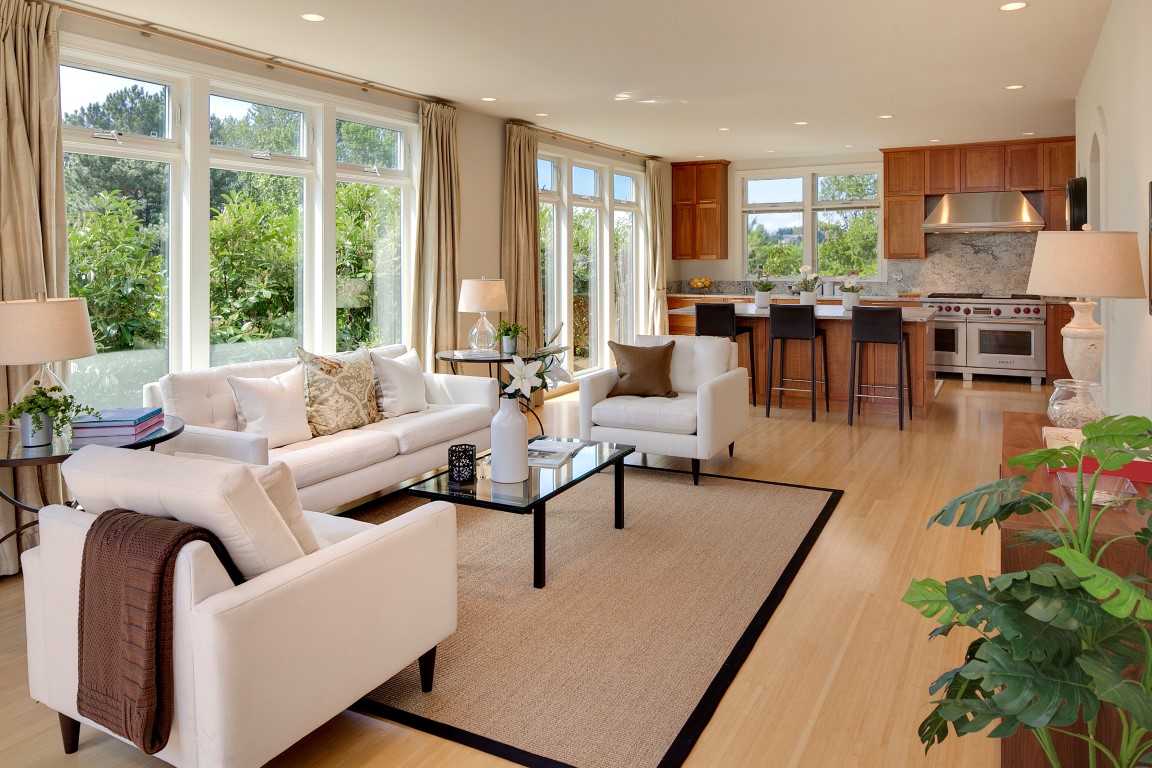
There are many components of this photo.
- The room is staged which helps give it interest and gives me something to capture.
- This photo was taken with my 24mm prime lens tilted down to capture more of the room and less of the ceiling.
- The scene is framed and given depth with the bookshelf on the right and the flowers on the lower left.
- The lights are turned on and 5 or 6 exposures were eventually blended to make this image.
- The sky and water was made bluer in post-production.
Most Challenging Home Interior Photos

What shots are the hardest to get right and hardest to teach others?
This photo is a difficult one to get right. The direct sunlight coming into the room makes it come alive but also completely blows out (makes overly bright) certain parts of the photo. To correct this, we take 3-5 photos at different exposures and then blend the photos with the optimal colors and brightness into one final image. Each individual window panel is color re-touched and cut into the final photo. The volume of the room needs to be 'felt' by the viewer and the exterior including landscaping, water and sky all need to be color corrected to capture how unique this room really is.
Post-production, HDR and Using Multiple Exposures

Do you use HDR? How do you get the deep, rich colors in each photo?
High-dynamic-range imaging can be done well and it can be done poorly. We don't use "auto-HDR" features found on some of cameras or software because of the unnatural final colors and tones often produced. We aim to capture brightness, color intensity and details found in real scenes and we do it all by hand.
We take multiple exposures for each final image and blend them together by hand in post production which results in an HDR image. It takes time to do it right but the results are worth it to us. It's what makes our images come alive and feel accurate at the same time. For every hour of shooting photos, we usually have about 3 hours of post production.
Before & After Post Production
Before

After

Before
After

Before

After
Dramatic Real Estate Photos

What gives photos like this the dramatic look?
We're known for being able to produce dramatic images when our clients want them. This photo was taken after sunset so getting the lighting right was key. We used auxiliary lights to light up the foreground and took multiple exposures from this perspective that were later blended for the final image. The glow of the interior rooms was punched up to give the home a warm, inviting, Thomas Kincaid look. The color of the sky and the light bouncing off of the landscaping was enhanced. The shot is framed in on the right by the tree but the left side of the image is left open to show how the home is lofted up above the grounds with views far into the distance.
Detailed Images

What makes a good interior detail shot?
You need to set up a scene and it really helps if there are some high-end details in the home. It many circumstances, you are pretty much showing "the space" but on some occasions, like this photo, you are showing some great details. This home has a high-end tile shower, a custom countertop, exotic cabinetry and designer fixtures. We added a few props, lit the candles and took multiple exposures which were later edited together to produce one rich, warm, detailed image.
Deliverables
How many photos do you typically deliver for each real estate shoot?
It's usually between 15 and 30 photos with about 20 being the most common. Our prices range based on how many photos are going to be produced and whether or not there are special requirements like sunset shots or using the aerial helicopter for photos.
Capturing Mood

What are some keys to capturing the right mood or feeling for space?
First of all, we always turn all the lights on and bring in our own lights when we need them. Second, some shots deserve to be taken at the perfect time of day, like this one, taken right after sunset. The sky, water color and fire are all natural in this photo and all look inviting. Like almost all of our photos this image is a result of several photos blended together for optimal clarity and color range.
Finding Strengths

What do you look for when taking each photo?
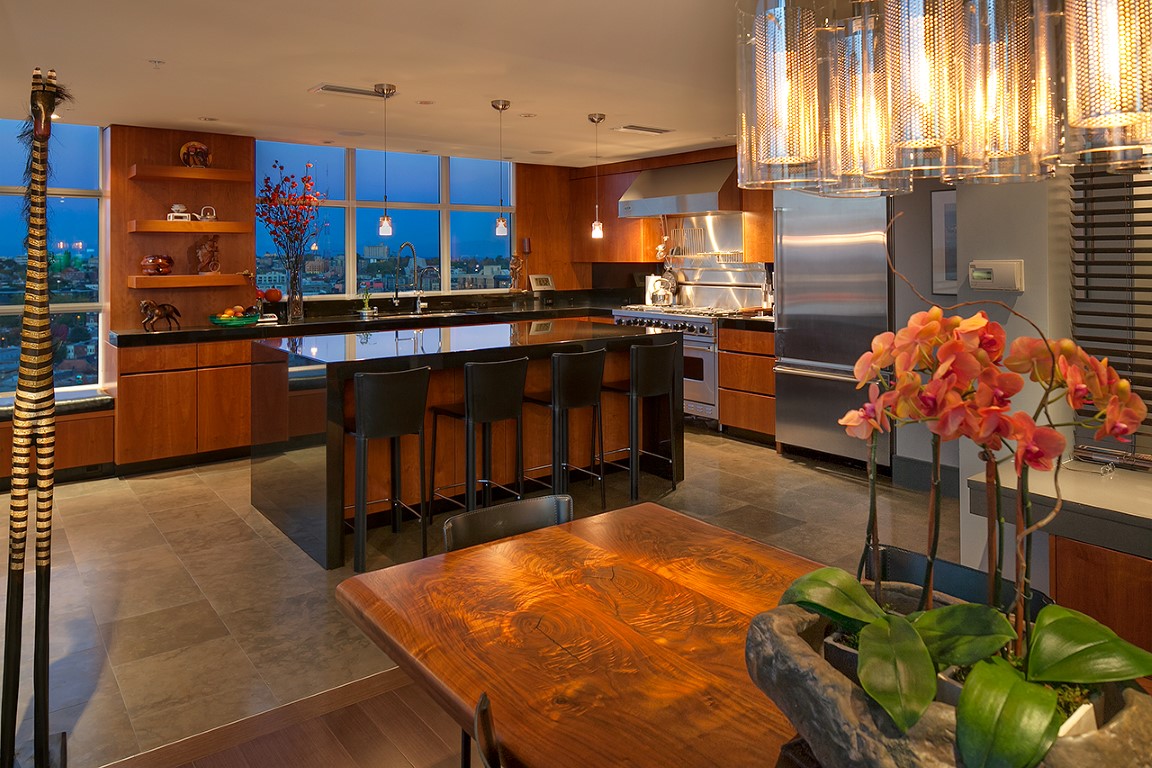
Real estate photography is all about finding and capturing a home's strengths. In this photo, the strengths are the floor to ceiling windows and gorgeous view over the lake. What actually mattered most in this photo was capturing the exterior accurately and showing the relationship with the interior.
Favorites & Wrapping Up

What are some of your favorite photos?
This image is one of my favorites and took an amazingly long time to produce. When the sun is just right, you capture the sky and water, then, you change exposures and capture the dining room, then you change exposures again and capture the hallway and stone doorway. This process repeats until you've got an optimal photo of each detail. The foreground is lit with strobes and there is additional lighting in the living room. There are probably 10 different photos edited together to make this one image.
Contact Information
Matt Edington - Real Estate Photographer
Clarity Northwest Photography - Seattle
Phone...